onsdag 18 november 2015

Seatbelt Assist.


My father in law was diagnosed with Parkinson disease he can still drive his car thanks to his medication. but the disease make him have enormous problems getting the seat belt on himself. So this is a tool that enables him to reach the seat belt better.

you simply clip it on the seat belt right below the buckle. (see picture)

It's a print in place thing but i used support for some of the over hanging parts (touching buildplate) see my screenshot for the places that needs it.

there is 2 different versions one that's simply snaps on and off and one that is more permanent with a little screw or a pin its up to you.


My printer settings on my reprappro mono mendel is:
Supports: Yes
Resolution: 0.25 mm
Infill: 20%
Speed: is up to you and your printer.

I must say that this sort of project is what makes 3Dprinting so priceless. Someone needs help and there is nothing to by. And when I get this sort of problem solving on my table I'm so happy to be able to help. :-D

And I realized when i was making it and tried it out. It's real good after chest day :-P (I'm a weightlifter)

There is more pictures if you follow the link or click here 


söndag 18 oktober 2015

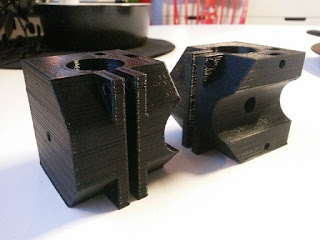
Mostly Printed CNC the Corner Block

The corner blocks are all done. 
and here are my printer settings I'm using Cura as slicer.


They turned out quit fine. 
Tomorrow I'm going to get the tubes 3/4" stainless steel tubes. ;-)

If you thinking of building one yourself here is all info you need. 

fredag 16 oktober 2015

mostly printed CNC part 1

Yesterday I started a new build :-D I'm going to build a CNC machine. And I have decided to build this one.


So now my Reprappro mono mendel is printing all day long. here are the first parts the corner blocks printed with 3 perimeters and infill at 70% and layer height 0.2mm 


I will work on this project simultaneousli as the injection mold machine. so stay tuned for more updates. 

fredag 2 oktober 2015

DIY injection mold machine part 4 THE MACHINE

Well the machine is up and running. And i have tried to make it as rigid as possible. I still don't have any plans for the hardware I just build it from the images in my head. ;-)   

But here is some pictures.

Here you have the heat chamber and the piston.

Heat protection!

This is the top of the tower.

Everything is made adjustable!

Safety first :-D

Some of my welding. 

The mechanism of the piston arm. with a lock in the top position.

some links to make the piston move straight down in the heat chamber.

And here is everything in place and it's alive :-D

Some brass spacers.

And the nozzle.

this is the heat chamber mounting whit a spring to lift the nozzle after the injection. 


that's all for now next time I'm going to show how i did my first mold. 


söndag 19 april 2015

DIY injection mold machine part 3

So after a few weeks waiting the electronics arrvied . :-D


Now the hardest part of this build started. I didn't have a clue how to make them work together :-P 
But after a few days of researching and som great help in this forum it started to make sense.  

And here is my simple wiring diagram. :-D


And on of the electricians made a professional version :-D


And that's is for now. Coming up next is more about the mechanics of the machine. :-D


tisdag 24 mars 2015

DIY injection mold machine part 2

So while I was waiting on the electronics I started to make some parts for the machine. I decided to start whit the melting chamber since i had the measurements of the heating band. So i took a dive in the metal scrap box at work and find a fitting aluminum rod.


The diameter was 80 millimeter so i had to work on it in the lathe. And when i was done it looked like this. :-D


I took it down to 70 millimeters and made a hole for the  piston. And then the lunch break was over. but the next day I was able to do some more. 


Those flat parts are for mounting and thermocouple probe. And I used a reamer to get a snug fit around the piston. 
And for piston I found a Little piece of stainless steel rod. 


To be continued...
   

lördag 21 mars 2015

DIY injection mold machine part 1.

Ok so this is one of my current projects an I will start from the beginning.

I was visiting a store called creativetools on a big event called 3Dexpo here in Sweden since iv got a 3Dprinter they are a re-seller of the most common 3Dprinters out there. 

And when I was there i spotted this little injection molder machine


And right away I started to think that it would be nice to be able to use all the plastic from bad prints to make molded plastic parts. And since I like to build things my self I started to plan how to make one. :-D  

So what do I need. It's got some source of heat and that needs to be controlled and then the hardware.
Started to search the net for information and on Ebay I found this:


and this:


So I order it it and started to wait. :-D

To be continued...


Itruduktion

Hello this is my first blog post in English so excuse my spelling.
I'm a 35 years old Swedish maker and I'm a big tech geek and i like to make stuff myself . I'm a professional welder and work in a mechanical workshop.

I already have a blog about 3D printing and R/C but it's in Swedish. But in this blog I will focus more on my maker projects. And will try to make it all in English. :-D

First here is some of my most popular post from my first blog. It's all in Swedish but it's possible to get it translated with Google translate 

It got over 2k hits. :-D

Almost 1000 hits :-D


That's it for now coming up soon is my homemade injection mold machine how it was made. So make sure to check in soon again. :-D